How To Make An Ombre Gradient Christmas Tree
 By Lisa Ben
·
October 20, 2026
·
11 min read

The first time I saw an ombre tree in a shop window, I assumed it took a stylist, a ladder and a frightening ornament budget. It took none of those. It took one afternoon, the baubles I already owned, and about twenty minutes of sorting them into piles on the dining table. That sorting is the whole secret, and it is the part most people skip.
Ombre just means the colour changes gradually instead of all at once. On a tree, you arrange the ornaments so the shade melts from deep and saturated at the base to pale at the top. You can run it the other way, pale at the bottom and deep at the top, and I will talk about that further down. Either way, the gradient does the decorating for you: nobody is looking at individual baubles, they are looking at the colour move.
Pick one colour family and stay in it
The one decision that makes or breaks this tree is the colour family. An ombre is a single hue travelling from dark to light. Mine is red pink: deep berry at the base, rose in the middle, blush above that, and white at the top. Gold works beautifully too, running from bronze through gold to champagne and pearl. Blue is the dramatic one, navy at the bottom fading up to ice blue and silver white. All three are lovely. What does not work is two families at once. The year I tried to fade red into gold, the middle of the tree just looked confused, and I took the whole thing down and started again.
Stay inside your family even when it hurts. The odd bauble that almost fits, the teal one in a blue tree, the orange red in a pink tree, will stick out far more on a gradient than it ever would on a mixed tree, because everything around it is so orderly. Put the misfits in a bowl on the table instead. They will look deliberate there.
Sort first. The sorting is the project
Before the tree even comes out of its box, empty every ornament you own onto a table or the floor and sort them into piles by shade. Darkest pile, then each step lighter, palest pile last. Hold baubles against each other rather than trusting your memory of what colour they are, because a pink that looks pale on its own turns out to be a mid tone next to a true white. I lay mine out in a long row, darkest to lightest, and shuffle pieces along the row until the steps look even.
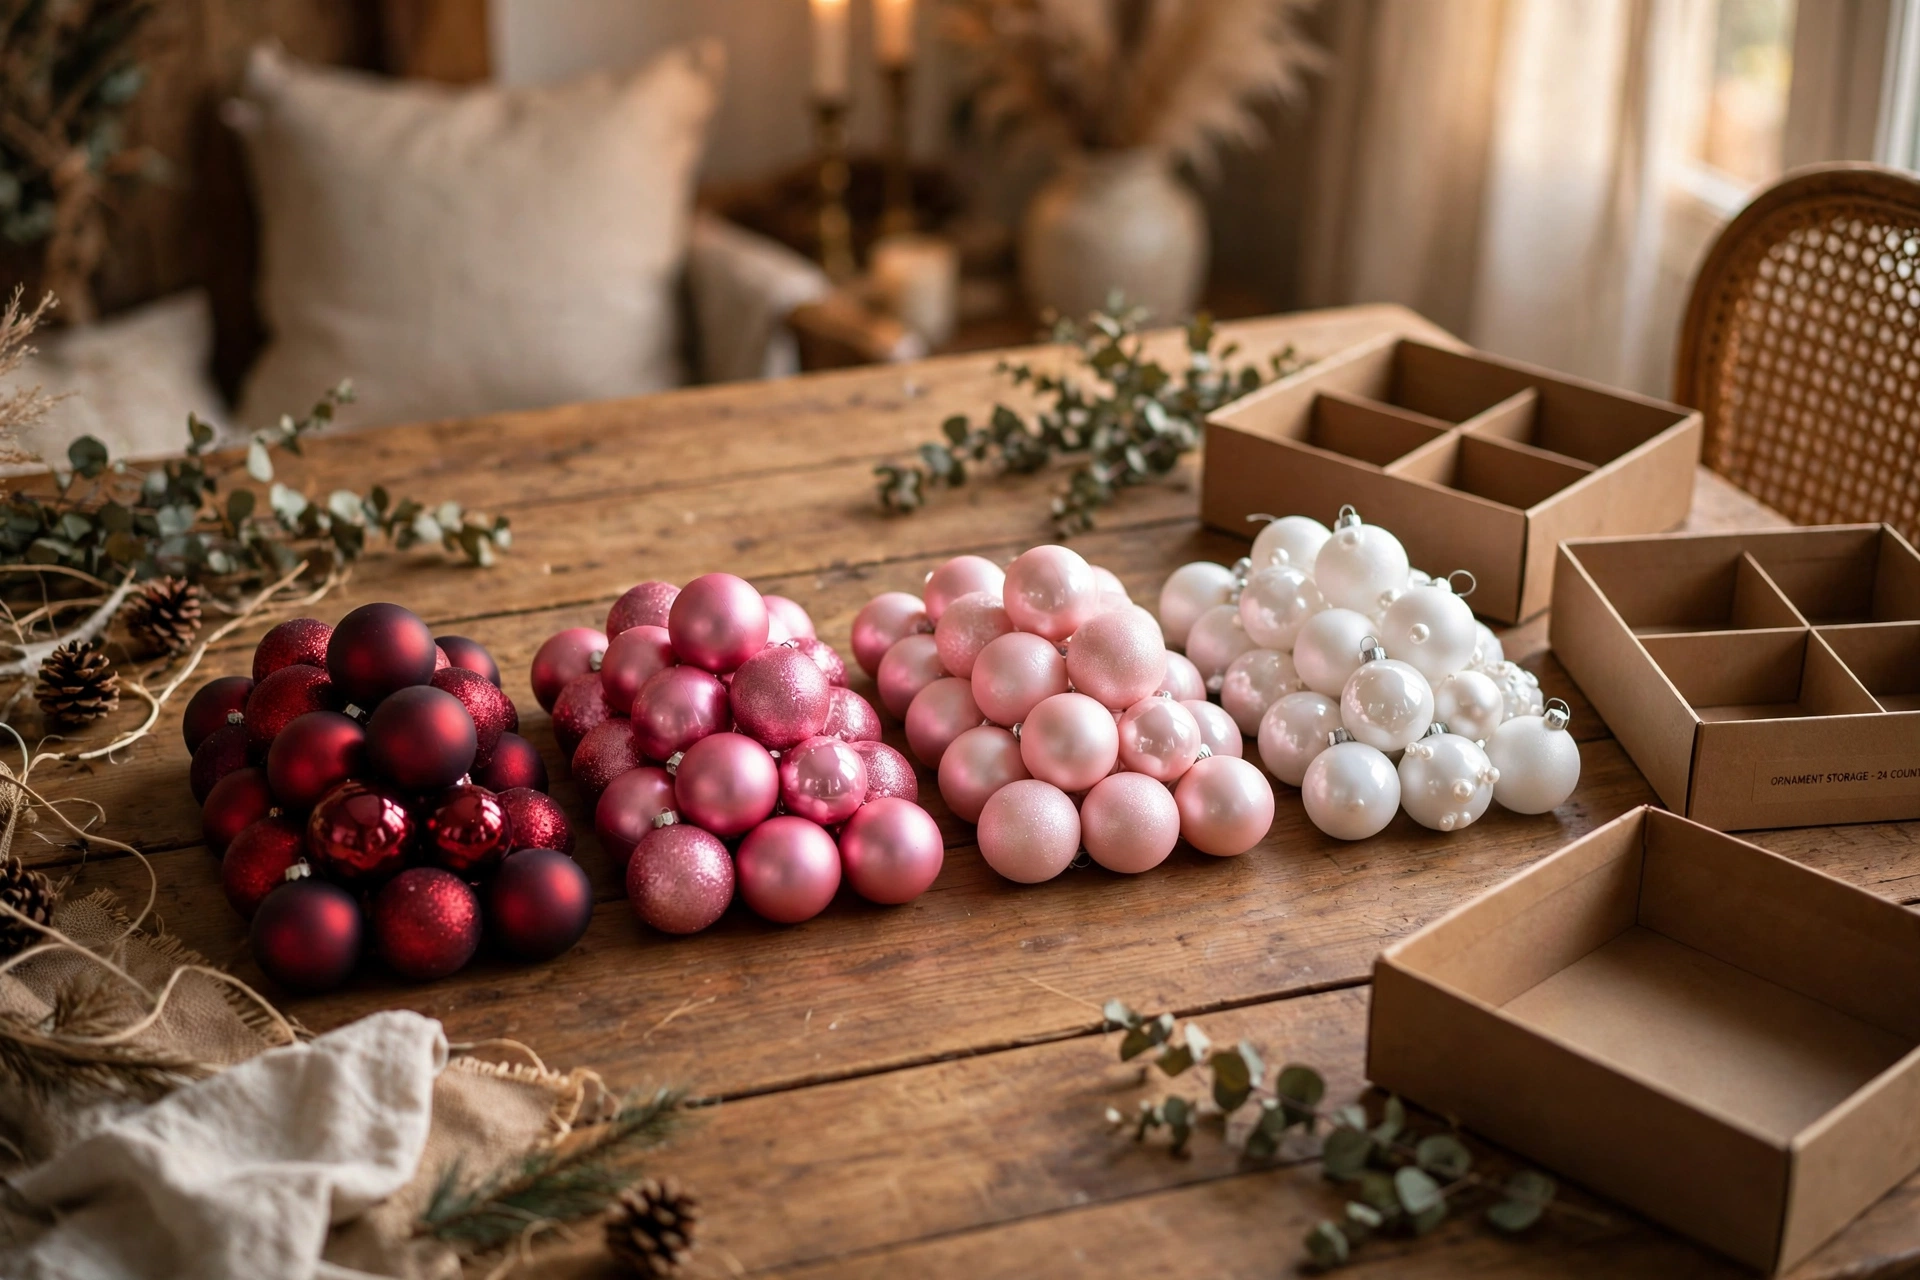
Here is what the sort will show you, because it shows everyone the same thing. You own far more mid tones than ends. Years of buying one pretty bauble at a time leaves you rich in rose and poor in deep berry and true white. That is fine, and it decides your shopping for you: if anything needs buying or borrowing, it is the two end piles, and only a handful of pieces in each. Do not buy more middles. You have middles. Whatever you do, finish the sort before a single ornament goes on the tree. Sorting on the tree, reaching and guessing as you hang, is how gradients turn into stripes.
Lights go on first, and they stay warm white
Lights before ornaments, always, and on this tree the colour of the lights matters more than usual. Warm white lights keep the gradient honest. They flatter every shade in the family and let the palest baubles glow instead of vanishing. Coloured lights fight the gradient. A string of multicoloured bulbs lays its own rainbow over your careful shading and the whole effect dissolves. If your only lights are coloured ones, this is the year a plain warm white set earns its money, or skip the ombre and enjoy the coloured lights on a mixed tree instead.
Plug the lights in and check every section before they go anywhere near the tree. A dead run of bulbs is a five minute fix on the floor and a miserable one once the tree is dressed, and fiddling with a faulty plug while balanced over a finished gradient is nobody's idea of a good evening. Wind the lights in and out of the branches rather than just around the surface, so the glow comes from inside the tree. Then stand back and look at the bare lit tree for a minute. You are about to divide it into bands, and it helps to see its shape first.
The section method: bands with soft edges
Now divide the tree, in your head, into horizontal bands. Thirds are plenty for a smaller tree. On a tall one, quarters give a smoother melt. There is no measuring and no marking. You just need to know roughly where one band ends and the next begins, because you will hang the tree one band at a time, starting at the bottom.
The darkest band goes at the base, and here is the part that makes it work: those deep baubles go everywhere in the band, deep inside the branches against the trunk as well as out on the tips. Then the next shade up, and at the boundary between the two, you deliberately mix them. For about a hand's depth, dark and mid tone hang side by side, unevenly, so the colour crosses over gradually instead of stopping at a line. That overlap zone is the difference between a gradient and a layer cake. Every boundary on the tree gets one. Work up band by band, overlap by overlap, until the palest pile goes on the top section, where the branches are thin and the baubles can be your smallest and lightest.

Decorate from the inside out
If your gradient looks thin or patchy, this rule is usually why. Most of us decorate the tips of the branches, because that is what we can reach and see. An ombre tree needs depth. Your big, plain, least precious baubles in each shade belong deep inside the tree, close to the trunk, where they fill the dark gaps and give the band its body. Save the pretty, detailed, sentimental ornaments for the branch tips, where they catch the light. A band that exists only on the surface will read as a sprinkle of colour. A band filled from the trunk out reads as a wash of it, and the gradient suddenly looks like the ones in the shop windows.
Ribbon and garland: match the bands or skip it
A swirled garland is the natural enemy of this tree. Ribbon wound in a spiral cuts diagonal stripes straight across your bands, and the eye follows the ribbon instead of the colour melt. You have two good options. Skip ribbon and garland entirely, which is what I do now; the gradient is decoration enough. Or run them with the gradient rather than against it: ribbon tucked in loose horizontal waves inside each band, matched to that band's shade, dark low and pale high. It looks lovely and it takes patience. What you cannot do is wrap a contrasting garland around the whole tree and expect the ombre to survive it.
The topper is the palest thing you own
The gradient ends at the topper, so the topper is the last step of the fade, not a separate decision. Use the palest thing you have: a white or clear glass star, a cream bow, a silver angel if silver is where your family ends. A heavy gold star on top of a tree that fades to white looks like it belongs to a different tree that got lost. Whatever you use to reach it, take the top band slowly. Use a proper step ladder with someone nearby if the tree is tall, keep three points of contact, and never lean out sideways from the top step with a bauble in each hand. The palest ornaments are the lightest, but a fall does not care what you were holding.
My shortcut: photograph the tree when you think you have finished, then look at the photo, not the tree. The camera is rude about banding in a way your eyes refuse to be. Every hard line and thin patch shows up at once, and ten minutes of adjusting the overlap zones fixes nearly all of it.
You need fewer ornaments than you think
Because the colour is doing the work, an ombre tree honestly needs less on it than a mixed tree. Gaps that would look bare on a normal tree just read as breathing room here, as long as each band is filled from the inside out. If the sort leaves you short in one shade, there is a respectable cheat. Plain old baubles can be spray painted to fill a missing step in the gradient. Do it outside or in a well aired garage, hang them from a stick or an old branch to dry, and use several thin coats rather than one thick one, which drips and wrinkles. I will be honest about the trade: sprayed baubles look perfect for a season or two, then the paint starts to flake at the caps and they go back in the craft box. For filling a gap in a gradient, that is a fair bargain.
Two variations worth trying
The reverse gradient runs pale at the base up to deep colour at the top. It is moodier and a little theatrical, and it makes the top of the tree the star, so give it your best topper and your darkest, glossiest baubles up high. It works especially well on a tree standing in a corner, where the base is half hidden by furniture anyway. The two colour fade is the harder cousin: one family at the bottom melting into a different family at the top, pink into gold, through a shared middle. The middle band has to contain pieces that could belong to either side, rose gold being the peacemaker in that example. If your sort produces a natural bridge pile, try it. If it does not, the tree will tell you, in stripes.
The mistakes that turn a gradient into stripes
- No overlap zones. Hanging each shade in a clean block, with the colour stopping dead at the boundary. The hand's depth of mixing at every boundary is the whole technique.
- Sorting on the tree. Guessing shades as you hang guarantees uneven bands. The sort happens on the table, before anything is hung.
- Coloured lights underneath. They lay a second, competing gradient over yours and the effect dissolves by evening.
- Tips only. Surface decorating with nothing deep in the branches, so the bands look sprinkled on instead of washed through.
- Decorating a corner tree all the way round. Actually, this one is fine, and I do it every other year. If your tree stands in a corner, decorate the front and sides properly and let the wall side carry lights only. Just decide that is what you are doing, and spend the saved baubles deepening the bands people can see.
Questions I get asked about ombre trees
How many ornaments do I need for an ombre tree?
Fewer than for a mixed tree of the same size, because the colour does the work. Sort what you own first and count by shade, not in total. Most people find they have plenty of mid tones and only need to top up the darkest and palest piles by a few pieces.
Can I do an ombre on a white or flocked tree?
Yes, and the palest band nearly disappears into the branches, which looks magical with the lights on. Because the top of the tree gives you so little contrast, start your gradient one shade deeper than you would on a green tree, so the fade still reads from across the room.
My baubles are all mixed colours from years of collecting. Can I still do this?
Pick the family you own most of and build the gradient from that. Everything outside the family comes off the tree this year and goes in a bowl, on the mantel, or on a wreath. Next year you can run a different family. The gradient asks for one season of discipline, not a new collection.
Does the gradient work on a small tabletop tree?
It does, and it is the easiest place to learn. Use three bands instead of four, choose your smallest baubles, and keep the overlap zones. A little tree is also where the reverse gradient looks best, with the deep colour up top where it is closest to eye level.
Sort the piles, light it warm, hang it in bands and soften every boundary. That is the entire method, and the tree in the photo at the top cost me nothing but an afternoon. Tell me in the comments which colour family your ornament boxes are hiding. I am always curious which one wins.
Lisa Ben
Lisa paints, builds, thrifts and rearranges her way through one very patient house, then writes down everything she learns here on Wazala. December is her favourite month to decorate for, and the tree goes up earlier every year. New projects land every Tuesday, Thursday and Saturday, and the Sunday Letter rounds them up once a week.
You might also like

9 Christmas Mantel Ideas From Plain To Full-On Festive
From a single garland to the full works: nine mantels that use what you already own.
Read more →
How To Make A Wreath For Any Season
One base wreath, four seasons of looks, and the order to build them in.
Read more →
A Simple Tablescape Formula For Dinner Guests
The repeat-after-me formula for a table that looks styled without a stylist.
Read more →