How To Hang A Gallery Wall Around The TV
 By Lisa Ben
·
October 17, 2026
·
8 min read
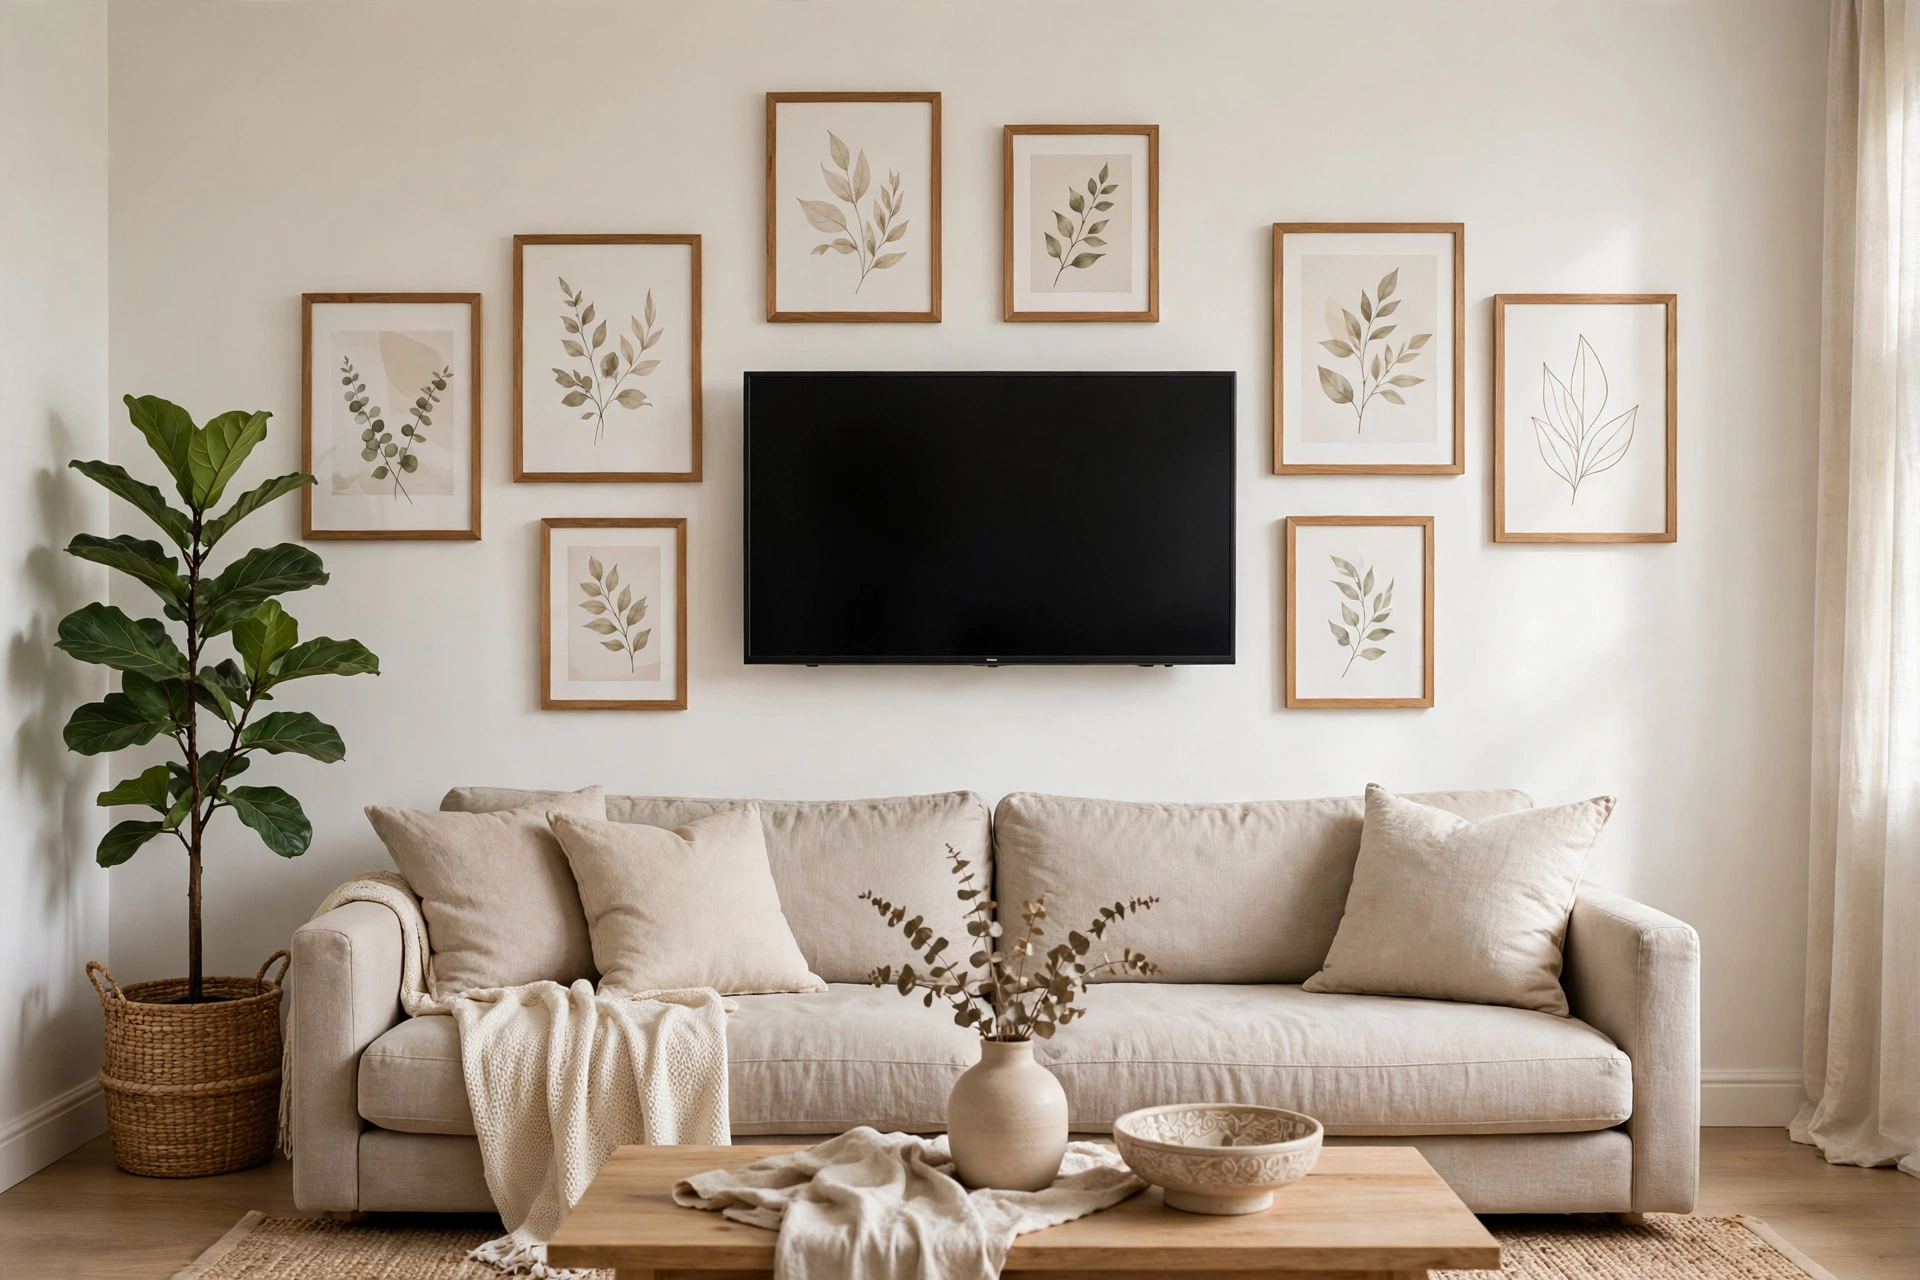
A TV on its own is a big black rectangle that swallows the wall. Mine sat like that for a year, looking like a cinema screen somebody had forgotten to take down, while the rest of the room had paintings, shelves and actual personality. The fix was not a bigger TV or a fancier stand. It was treating the screen as one piece in a bigger arrangement, and hanging a gallery wall around it.
Done well, the frames pull the TV into the room instead of apologising for it. Done badly, the wall looks like a jumble sale. The difference is almost all in the planning, and most of the planning happens before a single hook goes in. Here is the order I do it in, plus the mistakes I have already made so you do not have to repeat them.
First, decide which shape you are building
There are three layouts that honestly work, and picking one now saves a lot of taking frames down later.
Frames above the TV only. A row, or a loose cluster, running along the top of the screen. This suits low consoles and walls where the space either side of the TV is already busy with a door, a window or shelving.
Flanking the TV. Frames stacked on both sides of the screen and nothing above it. This one makes a wide wall feel taller, and it suits a TV on a stand with breathing room on both ends. Keep the two sides roughly balanced in size rather than identical. Perfectly matched pairs make the room look like a hotel lobby.
All the way round. Frames on three or four sides, so the TV sits inside the arrangement like the largest picture in it. This is the one in my living room, and it hides the screen best, because your eye reads the whole group as one big composition instead of spotting the TV first.
Whichever shape you pick, the outside edge of the whole arrangement should land roughly in line with the ends of your TV console, or a touch wider. Much narrower than the console looks pinched. Much wider, and the TV starts to look lost.
Plan it on the floor, then in paper
Lay every frame you are considering out on the floor or a big rug and build the arrangement down there first. Leave a TV-shaped hole in the middle: measure the screen including its frame, and mark the corners of that hole with painter's tape on the floor. Then shuffle. It is much easier to dislike a layout on the floor than on the wall.
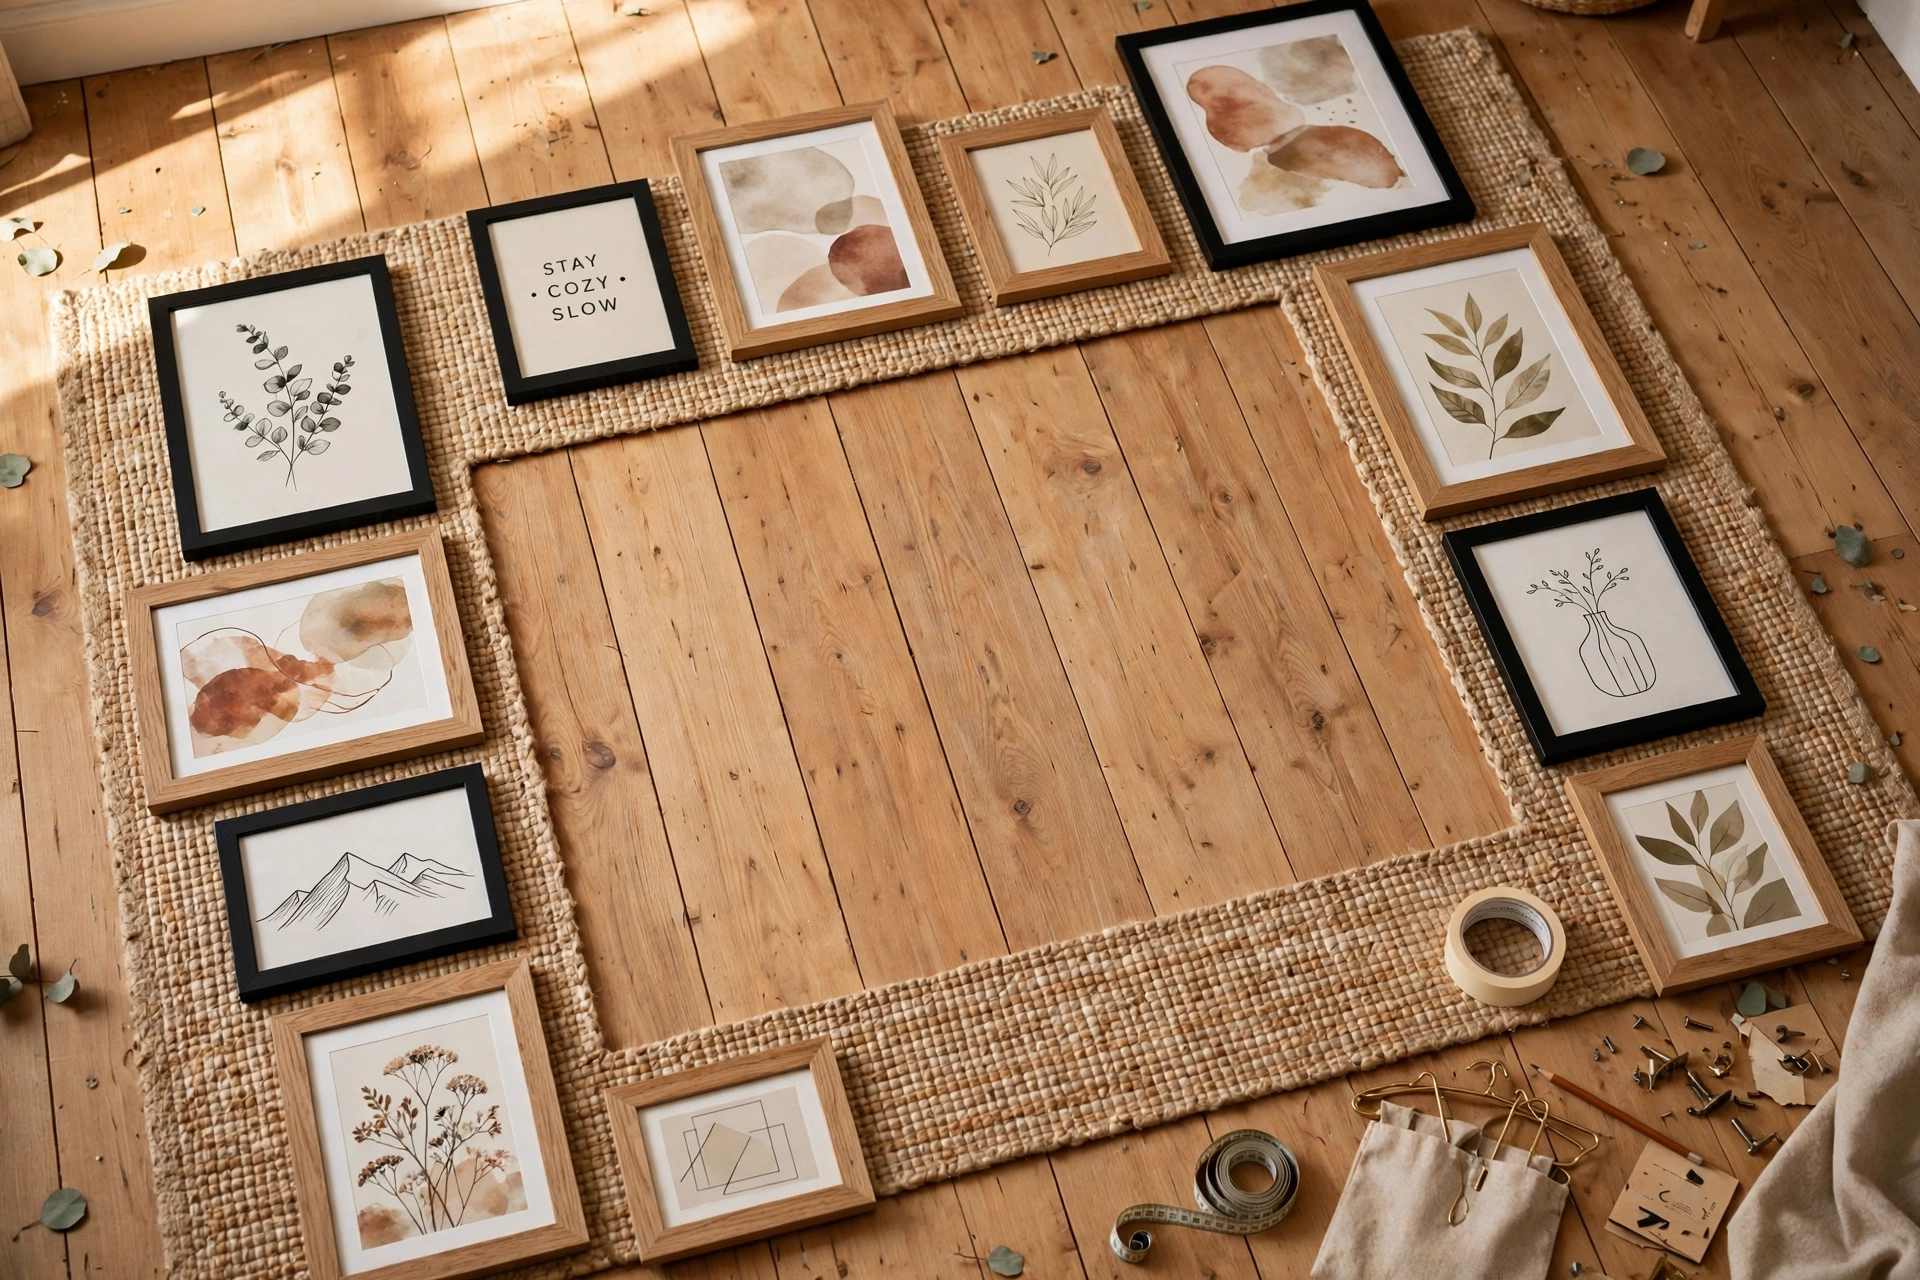
Once the floor version makes you happy, trace around each frame onto brown paper or newspaper, cut the templates out, and tape them up on the wall with painter's tape. Write the frame's size on its template, and mark where its hook or wire sits, because that mark is where your nail has to go.
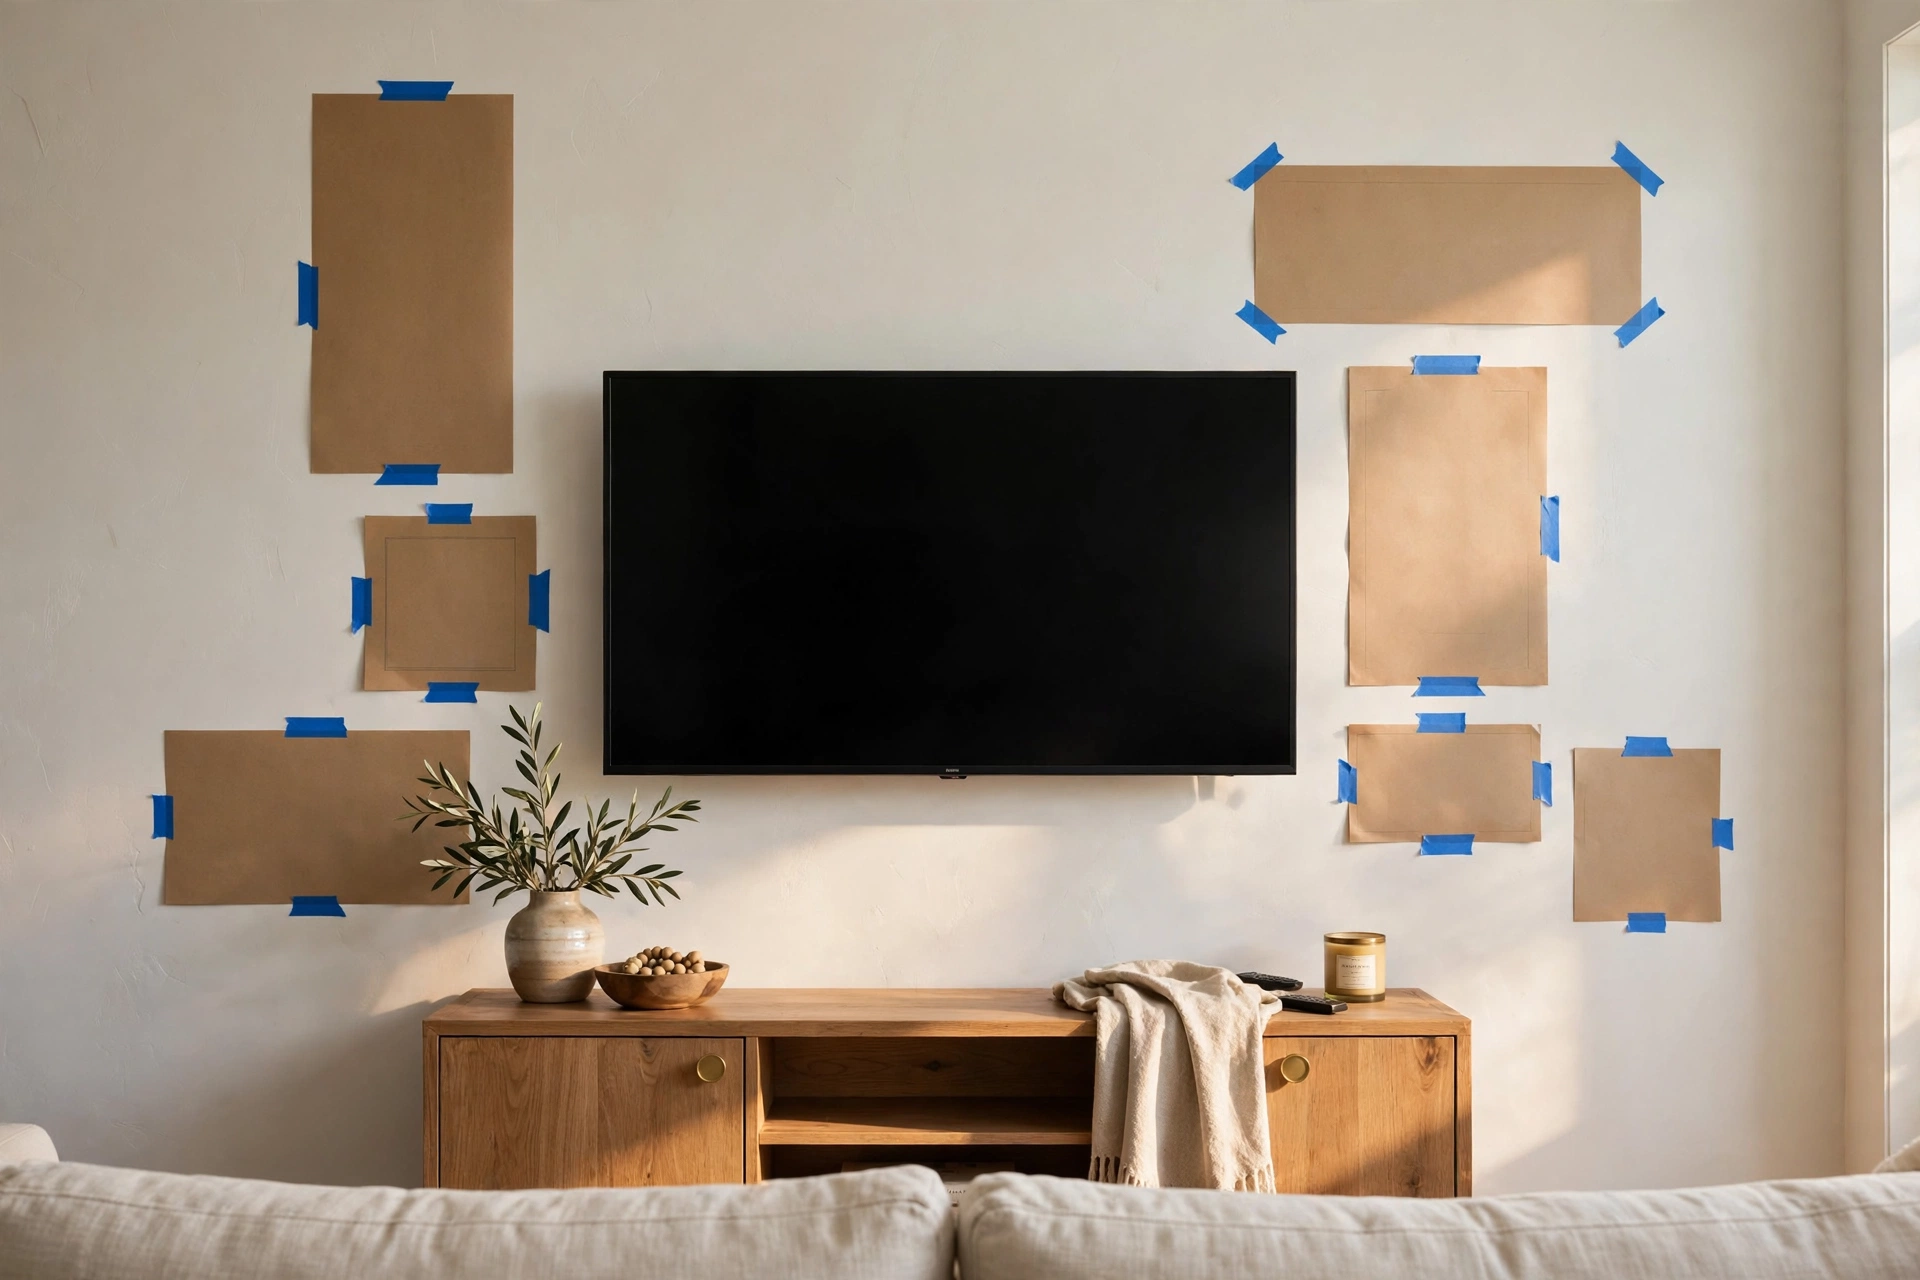
Live with the paper version for a day if you can stand it, and watch TV with it up at least once. You will spot the frame sitting too close to the screen, the one fighting with the lamp, and the gap that is somehow bigger than all the others. Paper is cheap to move. Filled holes and touched-up paint are not.
What I used:
- Brown paper or old newspaper, scissors and a pencil
- Painter's tape, for the floor plan and the templates
- Picture hooks in two sizes, plus drywall anchors for the heavy frames
- A spirit level and a tape measure
- Two spare frames, so one empty slot cannot hold the whole arrangement hostage
Spacing and frames: the numbers that keep it calm
Keep the gaps between frames small and even: 5 to 8 cm is the range that works. Bigger gaps make every frame float off on its own, and the wall reads as separate pictures instead of one arrangement. Whatever gap you choose, use it everywhere, including between the frames and the TV itself. The screen is one of the pieces, so it gets the same gap as everything else on the wall.
Pick one frame colour family and stay inside it: all black, all oak, all white, or black with one wood tone mixed in. Two families is fine. Four is a car boot sale. If your frames are a mixed thrifted set, paint is your friend: one coat of the same colour makes almost any frame belong.
The mats, the card borders inside the frames, matter more than people think. Keep them the same width and the same shade of white across the set and the whole wall calms down. Mixed skinny and wide mats are the quiet reason a lot of gallery walls feel restless even when the layout is good.
And aim for an odd number of pieces in total: five, seven, nine. Even numbers pair up in the eye and the wall splits itself down the middle. Odd numbers keep it moving. Remember that the TV counts as one of the pieces.
Add one or two things that are not frames
A wall of nothing but rectangles, with one enormous rectangle in the middle, can feel a bit like graph paper. Break it once or twice: a small wall shelf with something trailing off it, a round clock, a woven wall hanging, a pair of sconces. One or two is plenty, and they earn their place by changing the outline of the group.
My one rule is that the odd piece sits near the edge of the arrangement, never right against the TV. Next to the screen it stops looking like a choice and starts looking like clutter you have not tidied yet.
Hanging day: biggest piece first
Work from your paper templates and hang the largest frame first. That is your anchor, usually the biggest piece above or beside the TV. Get it level and exactly where its template was, then hang its neighbours one at a time, working outward, and check every gap against your spacing as you go. Take each template down only when its frame is about to replace it.
Level every frame, not just the anchor. A gallery wall is a grid your eye takes in all at once, and one frame two degrees off shouts louder than you would believe. A spirit level run across the top edge takes five seconds. Do it for the small frames too, especially the small frames. They are the ones that drift.
A quick word on fixings, because this is where gallery walls literally fall down. On brick or block walls, a wall plug and screw is the reliable route. On drywall, a single screw between studs will not hold a heavy frame for long: use proper expanding drywall anchors, or hang the piece from two hooks so the weight spreads. Adhesive strips are fine for the lightest frames and useless for anything big and glass-fronted. When in doubt, go one fixing stronger than you think you need.
Three mistakes I have already made for you
Hung it too high. My first version floated up near the ceiling, because I centred it on the wall instead of relating it to the furniture. The arrangement belongs to the TV and the console, not to the wall. The bottom row of frames should sit at a comfortable distance above the console, roughly at the height your eye rests when you are sitting down, not up in the rafters.
Too many tiny frames. Fifteen little frames read as noise from the sofa. You cannot actually see any of the pictures, only the fuss. Fewer, bigger pieces look calmer and usually cost less. One large frame does the work of four small ones.
Pretending the TV is not there. Laying out a perfect grid and then cutting the TV into it never works, because the black rectangle is the biggest, darkest shape on the wall and it will win. Design the arrangement with the screen counted in from the start, and it stops being an interruption.
Questions I get asked about gallery walls around TVs
How far should the frames sit from the TV?
The same gap you are using between the frames themselves, 5 to 8 cm, so the screen reads as part of the group. That distance also leaves the TV's vents and edges alone, and means no frame is resting against the screen when the wall gets bumped.
Does this work if the TV sits on a stand instead of the wall?
Yes. The above-the-TV and flanking layouts both work with a stand. Measure the screen as it sits on the stand, keep the lowest frames comfortably above the stand's surface, and remember the stand itself is part of the composition, so let the arrangement relate to its width.
My frames are all different colours. Do I have to replace them?
No. Either narrow what you hang to two colour families and store the rest, or paint the odd ones out. A single coat of matte black or white turns a mixed thrifted set into a family surprisingly fast. Same-width mats help even more than matching frames do.
How many frames do I actually need?
Around a medium TV, most walls land somewhere between five and nine pieces in total, counting the TV as one of them and aiming for an odd number. It depends on your frame sizes more than any rule, which is exactly what the floor plan is for. If the floor version looks full, stop adding.
Start with the floor plan, give the paper templates a day, and hang the big one first. The wall comes together faster than you expect from that point, and the TV finally looks like it lives in the room with the rest of you. If yours turns out well, I would love to see it. Gallery walls around TVs are my favourite thing to be nosy about.
Lisa Ben
Lisa paints, builds, thrifts and rearranges her way through one very patient house, then writes down everything she learns here on Wazala. Gallery walls are her favourite excuse to rearrange the living room. New projects land every Tuesday, Thursday and Saturday, and the Sunday Letter rounds them up once a week.
You might also like
Small Living Room Layouts: 6 Arrangements For Tight Spaces
Six ways to arrange a small living room, with the walkway measurements that make each one work.
Read more →
17 DIY Shelf Ideas For Every Room
Floating, bracketed, corner, ladder, crate: shelf projects ranked by effort and honesty about weight.
Read more →
The 12 Best White Paint Colours For Every Light Direction
Twelve whites sorted by the light your room gets, undertones included.
Read more →