How To Make A Wreath For Any Season
 By Lisa Ben
·
October 21, 2026
·
11 min read

For years I did what the shops wanted me to do. A spring wreath in March, an autumn one in October, a Christmas one in December, each of them bought, hung, and shoved into a cupboard where it got crushed a little more every year. Then one January I stood looking at three tired wreaths and one very bare door, and it clicked: I did not need four wreaths. I needed one good base and forty minutes, four times a year.
That is what this post is. You make the plain greenery wreath once, properly, and then you remake it each season by swapping the layer on top. The base stays. Only the pretty bits change, and most of those can come from the garden, a walk, or the fruit bowl. If you have never made a wreath before, this is the kindest way in: every season is another low-stakes practice run on the same base.
Start with the base, and choose it honestly
Everything hangs on the base, literally, so it is worth picking the right one for your temperament rather than the one that looks cutest in the craft shop.
A grapevine or willow base is my recommendation and the one in every photo here. It is a ring of twisted woody stems, and its great virtue is forgiveness. The surface is uneven, full of little gaps and pockets, so your wiring tucks in invisibly and small bare patches just read as texture. It also gives you something to push stems into, which makes the whole job less fiddly. If a bundle sits slightly wrong, nobody can tell.
A wire frame is the cheapest option and the hardest to make look full. There is nowhere to hide: every stem has to be wired on, and you need noticeably more greenery to cover the metal. It lasts forever and florists love it, but the first third looks worryingly bald. It fills in. You just have to trust it.
A foam ring is the easiest of all to decorate: push stems straight in, no wiring. The catch is that it is basically a one-style base. After a few hundred holes it starts to crumble, and pulling one season off to redo it is rough on the foam. Fine for one Christmas. Not the base for the four-season plan.
Whichever you choose, buy it once and buy it decent. The base is the one part of this project that is not free, and a sturdy one will carry years of remakes.
Get the size right before anything else
The most common wreath disappointment has nothing to do with skill. It is scale. A small, neat wreath on a standard door looks lost, like a porthole, and people assume they made it badly when actually they just made it small.
Measure your door. Most front doors are around 80 cm wide, and a wreath wants to take up roughly two thirds of that width, so somewhere near 50 to 55 cm across once it is fully dressed. Greenery adds width all round, so a 40 cm base usually lands about right. Do measure rather than guess, and remember you are measuring the finished wreath, not the naked base on the shop shelf. That gap surprises everyone.
The wiring order that hides all the workings
Here is the whole technique, and it is genuinely simple: small bundles, all pointing the same way, each one wired over the stems of the last. That is it. Every good wreath you have ever admired was made exactly this way.
Cut your greenery into short pieces, roughly 15 to 20 cm. Gather three or four pieces into a little fan-shaped bundle. Lay the bundle on the base with the leafy ends pointing around the ring, clockwise, say, and the cut stems trailing behind. Wrap florist wire (or garden twine, which I use for anything rustic) two or three times around both the bundle stems and the base, and pull it snug. Not strangling, just firm.
Now make the next bundle and lay it so its leafy ends cover the stems and wire of the first one. Wire that one down. Keep going, always the same direction, always overlapping. Because every layer of leaves hides the previous layer's mechanics, by the time you get back to the start there is no wire on show anywhere. Tuck the final bundle's stems under the first bundle's leaves, wire it, and snip. Work in bundles of a similar size and the wreath stays even instead of developing one fat side.
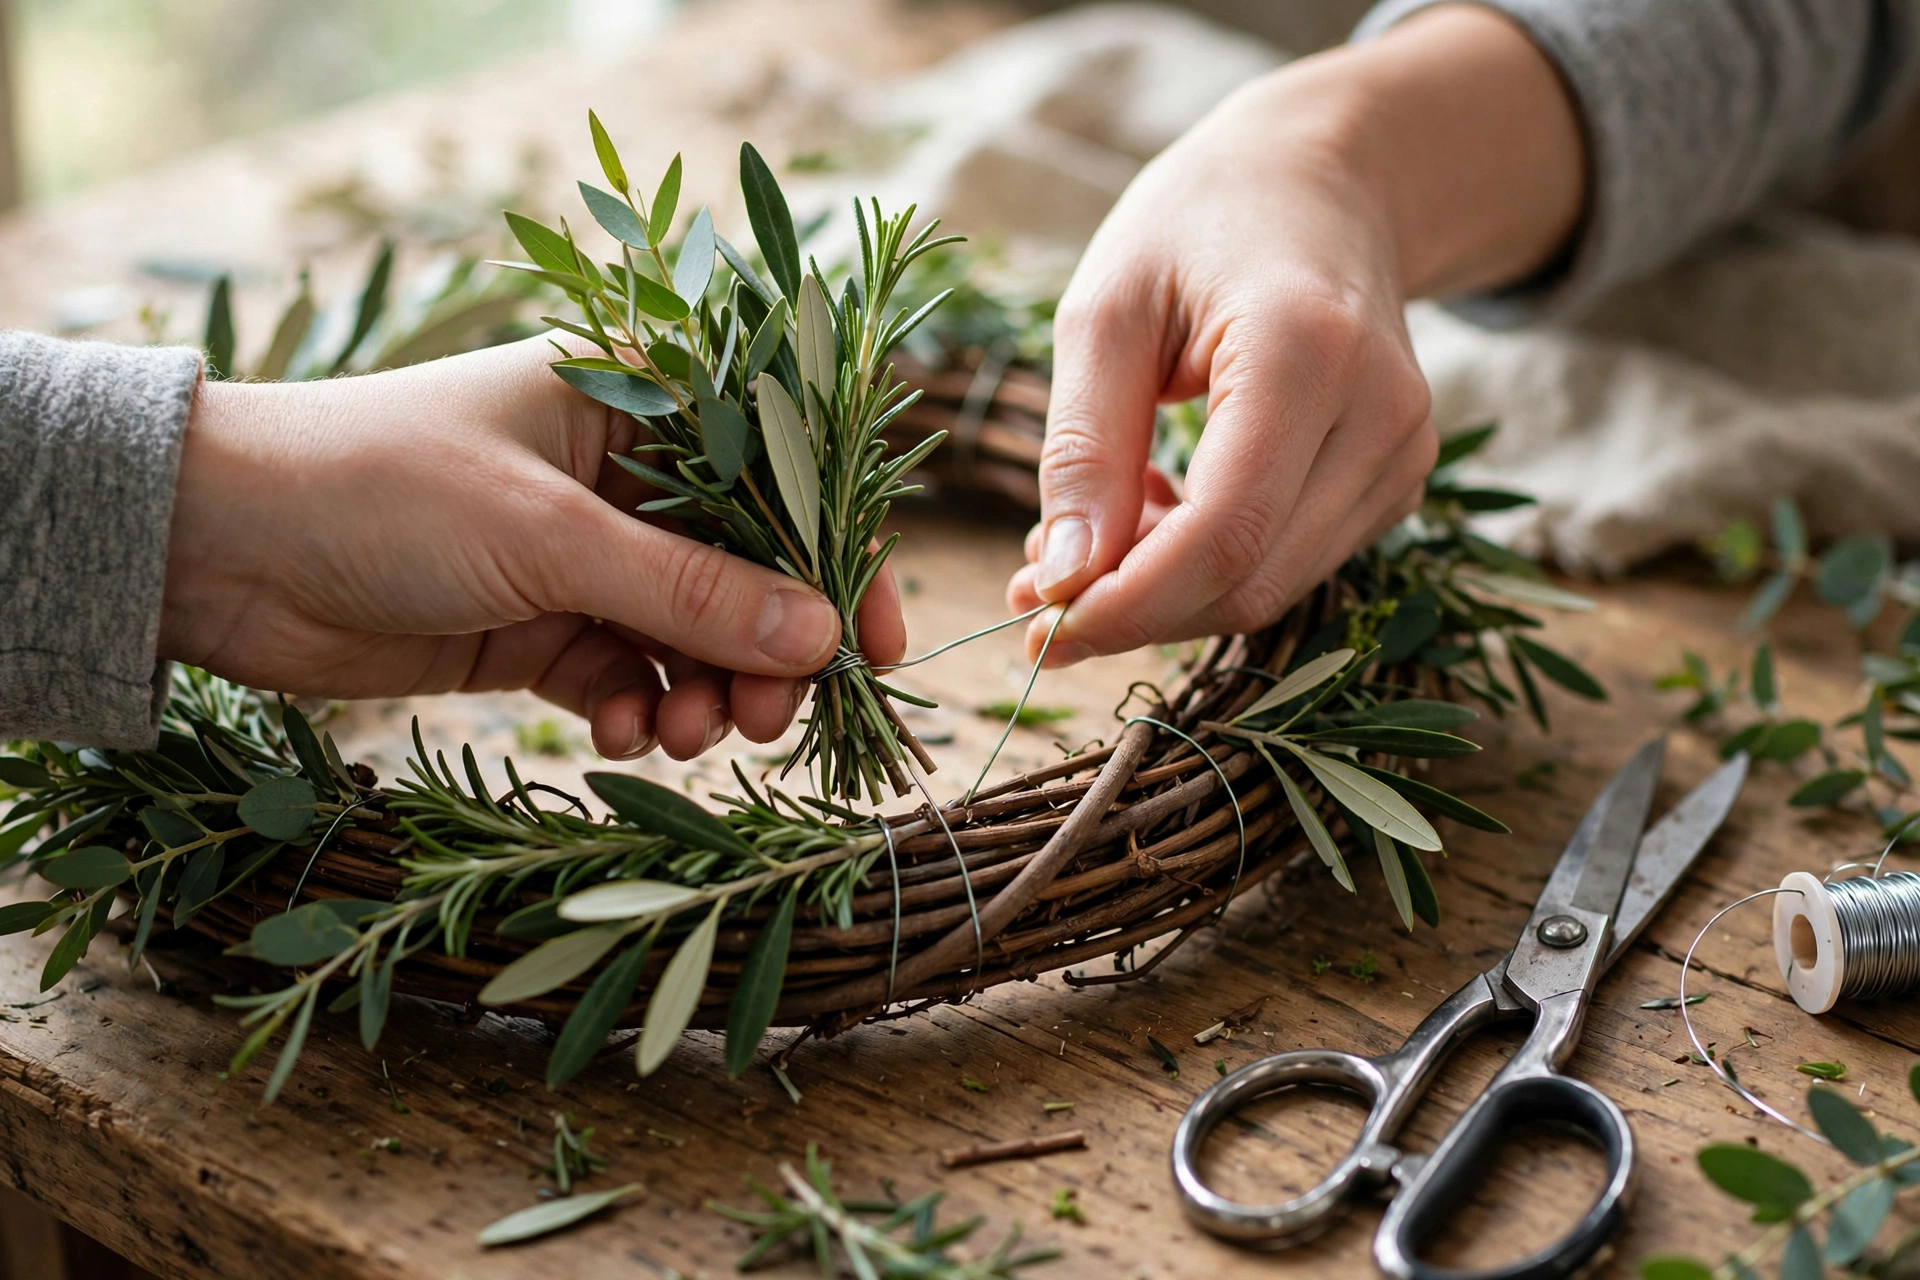
Layer it in three passes
Once the plain greenery body is built, every seasonal version follows the same three passes, in this order.
Pass one is the body, the greenery itself, and you already have it. Pass two is the season layer: the medium-sized things that say what time of year it is. Flowers, berries, cones, dried bits. Push their stems into the base or wire them on in little clusters, spread around the ring. Odd numbers look better than even, and clusters of three beat a lonely single anything. Pass three is one hero: a single bigger element at roughly the five o'clock position. A bow, a small bunch of dried oranges, a wooden star. One hero, not four. The wreaths that look professional are nearly always the restrained ones, and restraint is mostly a matter of stopping after pass three and putting the glue gun down.
Step back and look from two metres away before you declare it done. Wreaths are read from the pavement, not from your nose, and gaps you cannot see at arm's length will wave at you from the street.
The four season remakes
Same base, same greenery body (swap the greenery itself if it has tired), four different pass twos. Each of these takes me well under an hour, including the cup of tea.
Spring: blossom and a ribbon
Tuck in sprigs of blossom, real if your garden offers it, good faux if it does not, because spring blossom lasts about four days on a door. Add a few small white or yellow flowers, and finish with a ribbon bow as the hero, in something pale. Spring is the lightest version, so keep a fair amount of green showing. It should look like the hedge just woke up.
Summer: herbs and dried flowers
Summer is the scented one. Bundles of lavender, rosemary and bay wired in among the greenery, plus dried flowers, which handle the heat without fainting. Fresh flowers wilt on a sunny door within a day, so summer is where dried and faux earn their keep. A straw hat is too much. I checked.
Autumn: seed heads, cones and orange slices
My favourite, and the one in the photo at the top. Seed heads from the garden, small pine cones wired in by their scales, and dried orange slices, which you can make in a low oven in an afternoon and which catch the light like little stained-glass windows. This version lasts for weeks because almost nothing in it is alive. Rust, amber and cream ribbon if you want a bow, or skip it and let the oranges be the hero.
Winter and Christmas: evergreen and berries
For winter, rebuild the body itself with proper evergreen: fir, pine, holly, ivy, anything that shrugs off frost. Then red berries, real holly berries or faux clusters, and one generous bow as the hero. This is the plumpest version of the year, so let it be. A winter wreath is supposed to look like it is keeping the door warm.

Fresh, dried or faux: the honest version
Nobody needs to pick a team here, but it helps to know what each choice actually costs you in effort.
Fresh looks and smells the best and lasts the shortest. On a sheltered door, fresh greenery holds up for a couple of weeks; fresh flowers are a days-long commitment, and a door in full sun halves even that. Dried material lasts a whole season, weighs nothing, and keeps for next year if stored dry, though the colours soften. Faux lasts for years and asks for nothing, which is why I happily use faux berries and blossom, the two things nature makes most briefly. The trade-off is storage: crushed faux petals never quite recover, so it needs a box of its own.
My actual wreath is a mix of all three, and I think most good ones are. Use fresh for the body when it is plentiful, dried for the interesting bits, faux for the things that would otherwise last a weekend.
Hanging it without marking the door
A wreath this size is not heavy, but it is heavy enough that the hanging method matters, especially on a painted door you care about.
The simplest fix is an over-door hook, which slides over the top of the door and asks nothing of it. Check your door still closes cleanly with the hook in place, because some doors are fitted too tightly. My favourite for a flat, finished look is the ribbon method: loop a wide ribbon through the wreath, run it up and over the door, and fix it on the inside to a small hook or even a thumbtack in the top edge of the door, where no one will ever see the mark. The wreath hangs flat and there is a ribbon showing above it, which looks deliberate.
Removable adhesive hooks work, but be honest about the weight. Check the rating on the packet, weigh your finished wreath on the kitchen scale if you are near the limit, and clean the spot first so the pad grips. What I would not do is put a nail through a door I rent. A deposit is worth more than a wreath position, and the ribbon method gets the same result with no hole at all.
Storing the base between seasons
When a season ends, strip the top layer off and keep the base and body if the greenery is dried or faux, or strip it back to the bare base if it was fresh. Store it hanging on a hook in a shed or the back of a cupboard, or flat in a shallow box. The one enemy is damp: a wreath stored damp will smell of it forever, so let everything dry indoors for a day before it goes away. Treated like that, a grapevine base has an easy five years in it, probably more.
Mistakes I have made, so you do not have to
- Bundles pointing both ways. My very first wreath had greenery swirling in two directions and looked like it was being electrocuted. One direction, all the way round, no exceptions.
- All the decoration in one clump. It is tempting to build one glorious corner and leave the rest plain. From the street it reads as a bald wreath with a hat. Spread the season layer around the ring.
- A wreath too small for the door. Covered above, but it bears repeating because I did it twice. Measure the door, aim for two thirds of the width.
- Fresh greens on a door in full hot sun. They crisp like lettuce in a pan. Hot south-facing door means dried, faux, or a shaded hook on the wall beside it instead.
My shortcut: keep a small box labelled "wreath bits" with the wire, twine, ribbon ends and leftover cones and berries in it. Remaking the wreath then takes one box and one garden wander, instead of a full cupboard excavation four times a year.
Questions I get asked about wreath making
How long does a handmade wreath take to make?
The first build, base body and all, takes about an hour once your greenery is cut, and it is slower because you are learning the bundle rhythm. The seasonal remakes after that are genuinely quick: thirty to forty minutes to strip the old layer and wire on the new one.
Can I make a wreath with no wire at all?
Mostly, yes. On a grapevine base you can tuck and weave stems directly into the twisted vines, and twine works for anything that needs holding. Wire is faster and holds heavier things like cones more securely, but a tucked, twined wreath is a perfectly good wreath, and it all composts at the end of its life.
Why does my wreath look thin on one side?
Almost always uneven bundle sizes, or bundles spaced wider where you got tired near the end. Keep bundles the same size all the way round, overlap them evenly, and turn the wreath as you work rather than leaning across it. A thin patch can be rescued afterwards by tucking extra short stems into the base at that spot.
Will a wreath damage my front door?
Not if you hang it with an over-door hook or the ribbon method, which put nothing through or on the door's face. Two things to watch: a wreath swinging in wind can scuff paint, so hang it snug and flat, and wet greenery held against a door for months can leave a damp patch, so take it down and let the door dry between seasons.
One base, four seasons, and a door that never looks forgotten. Make the plain version first and live with it for a week before you dress it up; you will learn more from that one wreath than from any tutorial, including this one. Tell me in the comments which season you are starting with, and what is growing near you that might end up on it.
Lisa Ben
Lisa paints, builds, thrifts and rearranges her way through one very patient house, then writes down everything she learns here on Wazala. Her front door wreath is remade four times a year from the same grapevine base. New projects land every Tuesday, Thursday and Saturday, and the Sunday Letter rounds them up once a week.
You might also like

9 Christmas Mantel Ideas From Plain To Full-On Festive
Greenery first, then candles, then sparkle: the layering order that works at every level of effort.
Read more →
Paint Your Front Door: Colours And The Full Weekend Method
Prep, the finish that survives weather, and testing a bold colour first.
Read more →
Propagate Pothos: Turn One Plant Into Twelve
Free plants from one mother plant, and enough trailing greenery to fill every shelf you own.
Read more →