How To Clean Grout So It Looks New Again (Mostly)
 By Lisa Ben
·
October 30, 2026
·
14 min read
Nobody notices grout when it is clean. Then one morning you are standing in the bathroom, toothbrush in hand, and the lines between your tiles have quietly turned the colour of old tea. Mine did it twice, in two different houses, and both times my first instinct was to reach for the strongest bottle under the sink. That instinct is wrong, and I say that as someone who has learned it the itchy-eyes way.
Here is my honest promise for this post, and it is why the title says mostly. Most dark grout is surface dirt and soap film, and that lifts. Some grout is stained all the way through, and no amount of scrubbing brings that back to new. It lightens, it looks a hundred times better in photos, and then it settles at a respectable off-white. I would rather tell you that now than have you on your knees for an hour chasing a result the grout cannot give you.
Why grout goes dark in the first place
Standard grout is cement and sand, and cement is full of tiny holes. Think of it as a narrow strip of pavement running between your tiles, soaking up whatever washes over it. Dirty mop water on the kitchen floor. Shampoo and conditioner film in the shower. The pink-tinged soap scum that collects where the shower spray hits the wall. Every wash leaves a little behind, and because the grout sits lower than the tile faces, dirt and grit collect in the channel and get walked in or sponged in deeper.
The other half of the problem lives below the surface. In a bathroom that stays damp, mould grows on that soap film and sends its staining down into the body of the grout itself. That is the difference between a line that scrubs clean in five minutes and a line that stays shadowy no matter what you do. The first kind is dirty. The second kind is dyed. Cleaning removes dirt. It can only fade a dye.
Before you mix anything: the safety rules
- Never mix bleach with vinegar, or bleach with ammonia. Either mix makes gases that can burn your lungs. The same goes for mixing bleach with any other cleaner, including toilet cleaner. One product at a time, rinsed away before you try another.
- Open a window or run the fan before you start, and leave it running while you work. Bathroom air gets strong fast.
- Wear gloves for anything stronger than bicarbonate paste, including oxygen bleach solutions. Your hands will be in it for a while.
- Keep acid mixes off natural stone tiles. Marble, travertine, limestone and slate get etched by vinegar, lemon and limescale removers, and the dull marks do not wash off.
- Test any mix in a hidden corner first, behind the loo or under the bath mat, and wait ten minutes. If the grout or tile changes colour there, it will change everywhere.
What you need
Nothing fancy. The gentle method runs on a box of bicarbonate of soda and a brush you were about to throw away.
- Bicarbonate of soda (baking soda)
- An old toothbrush, or a stiff grout brush if you are doing floors
- A spray bottle of plain water
- Two cloths, one bucket of clean water, rubber gloves
- Optional, for the stubborn jobs: oxygen bleach powder, a steam cleaner, a grout pen or colour sealer, and a penetrating grout sealer for afterwards
Start gentle: the bicarbonate paste method
This is the method I use first, every time, on every tile floor and wall in this house. It handles the great majority of grey grout, it costs pennies, and it cannot hurt your tiles, your lungs or your hands. Start here even if you suspect you will need the stronger stuff later, because half the time you will not.
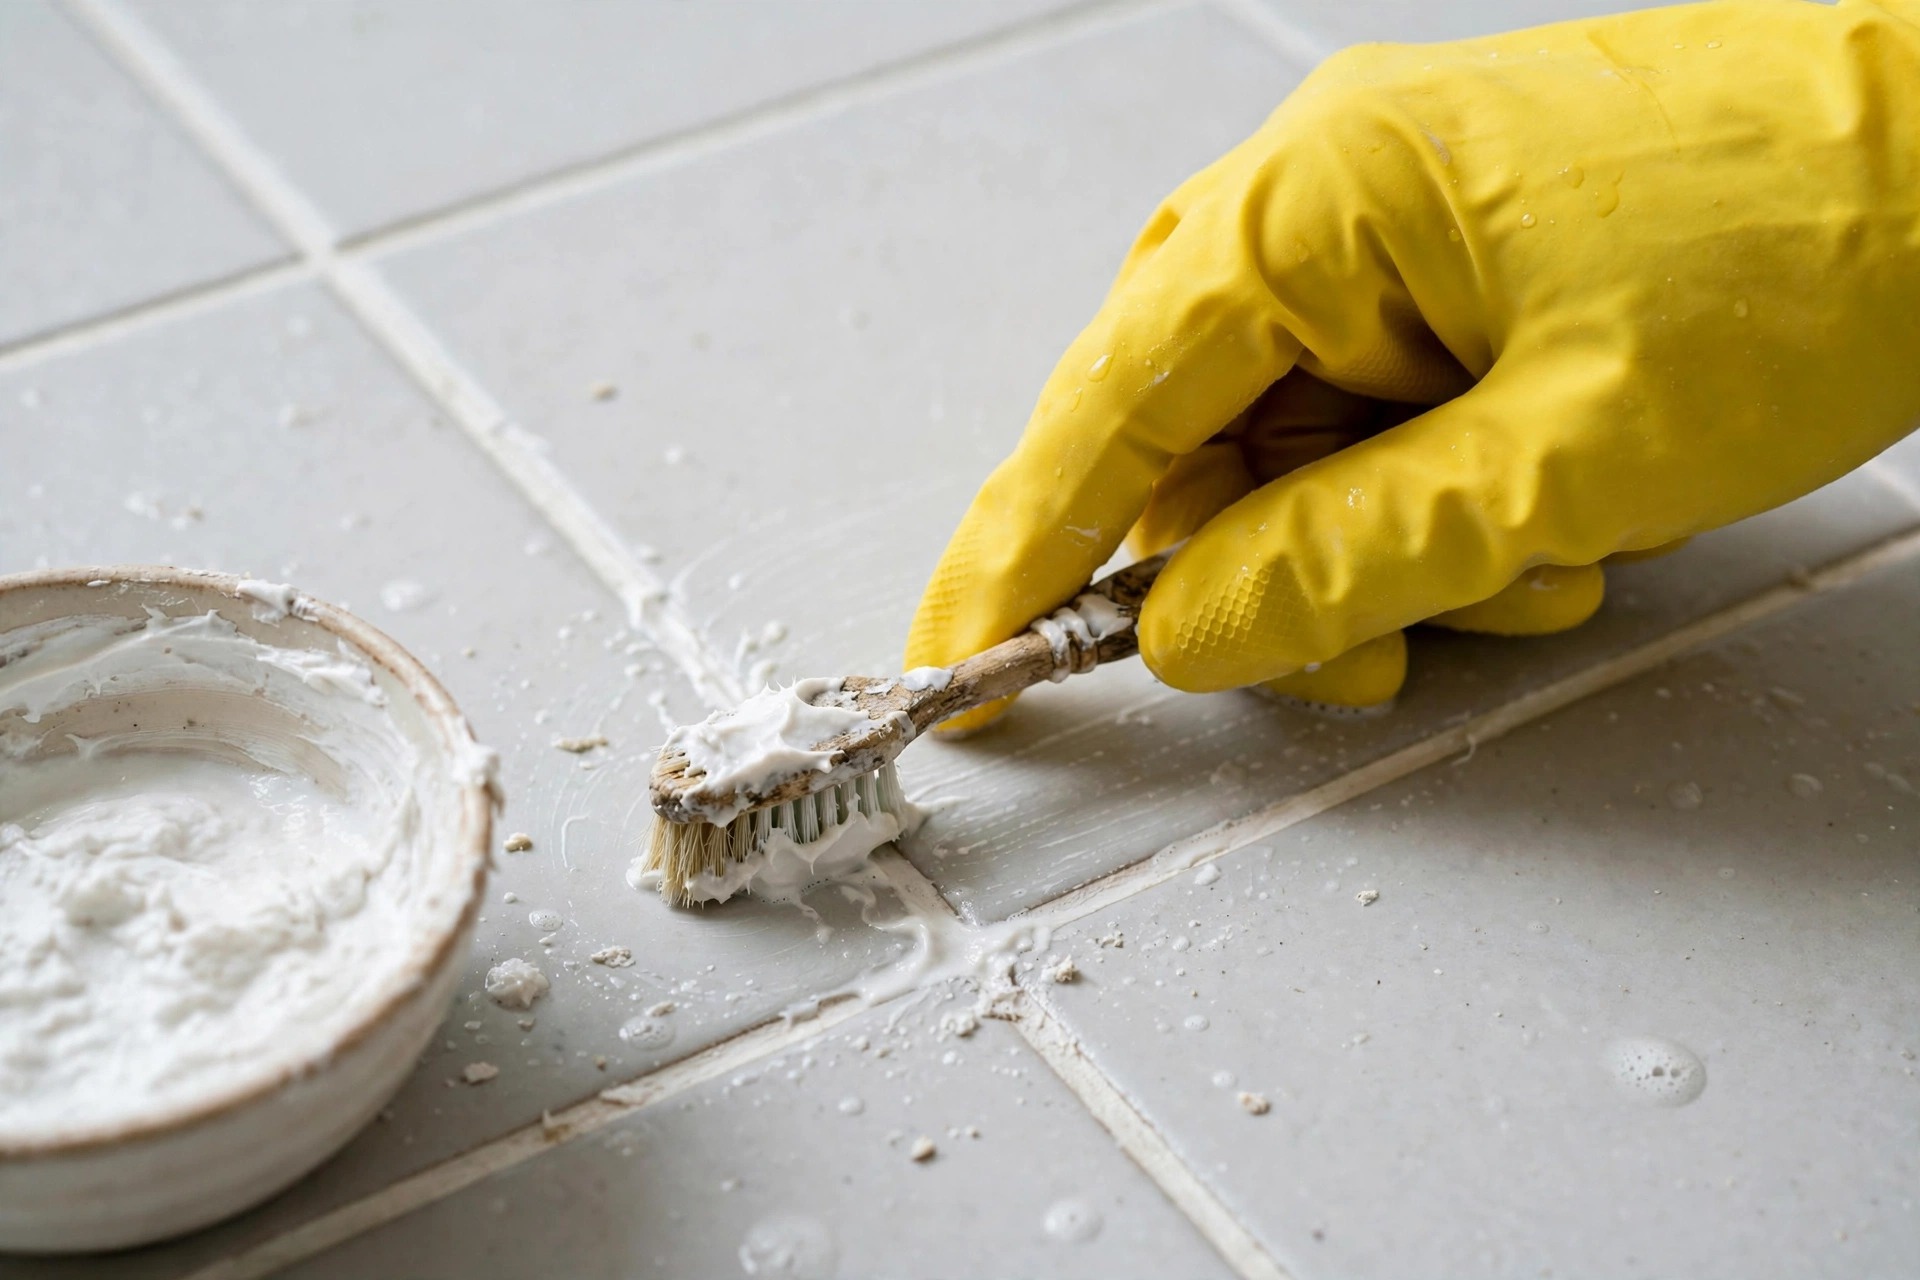
Mix roughly three parts bicarbonate to one part water in a small bowl. You want the texture of toothpaste, thick enough to sit in the grout line without sliding out. Work one stretch of wall or one square of floor at a time rather than pasting the whole room at once, because the paste only works while it is damp. Spread it along the lines with your fingertip or the brush, then give it a light mist from the spray bottle.
Now the part everyone skips: leave it alone for ten to fifteen minutes. The paste needs time to loosen the film it is sitting on. Pour a coffee. If the paste starts to dry out and go chalky, mist it again. Dwell time is doing the heavy lifting here, and it is the whole difference between this method working and people deciding it does not.
After the wait, scrub along the line with the toothbrush in short back-and-forth strokes. Follow the line rather than scrubbing in circles across the tiles, because the dirt is in the channel, not on the tile face. You will see the paste turn grey as it picks the dirt up, which is oddly satisfying and also your progress report. For kitchen and hallway floors, swap the toothbrush for a stiff scrubbing brush and work kneeling on a folded towel. Your knees will thank you in a way your grout never will.
Rinse with a cloth wrung out in clean water, and change the water when it clouds. Leftover paste left to dry in the lines turns white and powdery and looks, cruelly, like dirty grout all over again. Dry the area with the second cloth, then judge it properly in daylight. Lines almost always look darker while they are wet, so do not declare defeat over a damp wall.
When gentle is not enough: oxygen bleach
For shower grout that stayed grey after the paste, or for the black-ish staining in the corners where water sits, this is my step up. Oxygen bleach is the powder sold as oxy stain remover for laundry. The active ingredient is sodium percarbonate, and when it dissolves in warm water it releases hydrogen peroxide. That peroxide does the cleaning and the brightening, it works on colour-stained grout as well as plain dirt, and unlike chlorine bleach it is safe on coloured grout and fabrics, which matters when the shower curtain is hanging right there.
Dissolve the powder in warm water following the amounts on the packet, because strengths vary between brands and the packet knows its own product. Gloves on, window open. Apply the solution generously along the grout lines with a cloth or sponge. On floors you can pour it carefully along the lines instead. Then give it real time: twenty to thirty minutes, re-wetting any line that starts to dry out. This is not the step for standing over it with the brush. Go and do something else and let the peroxide work its way into the pores.
Come back, scrub the lines once with the brush, and rinse well with clean water. On the worst shower grout I have owned, this took the lines from dark grey to a pale, even colour I could live with. It did not make them new. Years of mould staining had gone too deep for that, and if your grout is in that state, yours will lighten the same way and then stop. That stopping point is the grout telling you the truth, not the method failing.
The truth about chlorine bleach
Chlorine bleach is the bottle most people reach for, and I mostly leave it in the cupboard. Here is why. Bleach whitens the very top layer of the grout, so the lines look dramatically cleaner within minutes, but it does little to lift the dirt and staining sitting deeper in the pores. A week of showers later the film builds back over the pale surface and the lines look grey again, sometimes faster than before, because repeated bleach use can roughen and degrade grout over time. It also fills the whole house with a smell that hangs around for the rest of the day, and it can splash-spot anything fabric it touches.
If you are going to use it anyway, use it knowingly. Dilute it as the label directs, gloves on, window open, fan on. Keep it on ceramic or porcelain tiles only, off coloured grout, since it can pull the colour out of the lines unevenly, and off any metal fittings you care about. Rinse thoroughly. And hold the line from the safety box: one product only, never mixed with vinegar, ammonia or anything else, ever.
If you have a steam cleaner
A steam cleaner with a small nozzle is a genuinely good grout tool, because hot steam loosens the greasy film with no chemicals at all. Point the jet along the line and move slowly, much slower than feels natural, and wipe the loosened dirt away with a cloth as you go, otherwise it just resettles in the next line over. It is the method I reach for on the kitchen floor, where I do not love the idea of cleaning products around food prep areas. One caution: on old grout that is already cracking or sandy, steam can lift loose bits out. Test a corner, and if crumbs come away, that grout needs repair, not cleaning.
Grout pens and colour sealers: the honest makeup option
Let me be plain about what these are. A grout pen or colour sealer does not clean anything. It paints a thin, coloured coating over the top of the line, so stained grout looks fresh because you are looking at new colour, not at rescued grout. That is makeup, and makeup has its place. This is the right call when the staining is deep but the grout itself is sound, when you are refreshing a bathroom before selling or renting, or when you simply want the lines a different colour and re-grouting the whole room is out of proportion to the problem.
Two rules if you go this way. First, the grout underneath still has to be cleaned and left to dry completely, a full day, or the coating peels off in sad little strips within a month. Second, it suits sound grout only. Lines that are cracked, crumbling or hollow-sounding need the grout raked out and replaced, and no coating will hide that for long. In a shower, expect a pen or sealer coat to need a refresh every couple of years rather than lasting forever. In a dry hallway, it lasts far longer.
Reseal wet-area grout after a deep clean
Once a deep clean has done all it can, sealing is what stops you repeating the whole job in three months. A penetrating grout sealer soaks into the pores and slows down how fast water and dirt follow. It does not make grout waterproof, whatever the tin implies, but it buys you time and makes the weekly wipe actually work.
Timing matters more than brand. Let the cleaned grout dry fully first, at least a day and ideally two, because sealer trapped over damp grout locks the moisture in. Run the sealer along each line with its applicator or a small brush, wipe any smears off the tile faces within a few minutes, and stay out of the shower until the product's stated curing time is up. In the shower itself, plan on re-doing this roughly once a year. Kitchen and hallway floors, once a year to every couple of years is plenty.
Keeping it clean is cheaper than cleaning it
Everything above is the rescue. This part is why rescues get rarer. The single best habit costs thirty seconds: run a squeegee down the shower walls after the last shower of the day. Most of what stains grout arrives in water and soap film, and the squeegee takes both off the wall before they settle into the lines. Second habit: leave the fan running or the door ajar for twenty to thirty minutes after a shower, because grout that dries out between uses grows far less mould than grout that stays damp all day.
On tiled floors, wipe along the grout with plain water and a flat mop most weeks. Plain water, not cleaner, because cleaner residue left in the lines is itself sticky and collects the next round of dirt. The weekly wipe stops grit getting ground into the pores by shoes, and it takes five minutes once the floor is already sealed. Wash the bath mat regularly too. It sits damp against the same patch of floor grout for days at a time, and the dark patch underneath it is usually the mat's fault, not the floor's.
My routine, if it helps: squeegee daily, fan for half an hour, a plain-water mop over the floor lines on Sundays, and the paste method in the shower about four times a year. The big deep clean with oxygen bleach is now a once-a-year job, and some years it does not need doing at all.
Mistakes that make grout worse
Acid mixes on stone tiles. Vinegar, lemon juice and limescale removers etch marble, travertine and limestone, leaving dull patches that no cleaning removes. They can also eat into cement grout itself if they are left sitting on it. Fine on plain ceramic at a pinch, risky everywhere else, and never worth it when bicarb exists.
The wire brush. A wire brush on soft cement grout shreds the surface into grooves that hold even more dirt, and it scratches tile glaze on the way past. A stiff nylon brush is the ceiling here. If nylon and dwell time are not shifting it, the answer is a stronger soak or acceptance, not a harsher brush.
Flooding the edges of wooden floors. Where tiling meets wood in a kitchen or hall, enthusiasm with the rinse bucket sends water under the board ends, and boards that drink from underneath can cup and lift. Wring the cloth out and keep the edges of the job nearly dry.
Trying to clean blackened silicone. The black that grows in the sealant bead around baths and showers is mould running through the silicone itself, and it will not scrub out, because it is not on the surface. The fix is replacement: score along both edges of the old bead with a craft knife, peel it out in strips, wipe the gap clean, let it dry completely, then run a new bead of sanitary silicone, smooth it with a wet fingertip, and leave it a full day before the shower runs again. It is an hour's work and it is the only version that works.
Sealing over dirty grout. Sealer over a grey line locks the grey in and coats it against everything you later try to clean it with. Clean first, dry fully, then seal. In that order, always.
Questions I get asked about grout
Why does my grout go dark again so fast?
Because it is porous and, in most homes, unsealed, so every shower and mop re-wets the same dirt film into the same pores. The fastest-darkening lines are always where water sits longest: the shower floor edge, around the bath, behind the kitchen sink. Sealing after a deep clean, plus the squeegee habit, stretches the gap between cleans from weeks to months.
Can I use vinegar on grout?
On plain ceramic or porcelain tiles with cement grout, heavily diluted and well rinsed, it will not do much harm used now and then. But it is not my regular method, for two reasons: repeated acid slowly dissolves the cement the grout is made of, and it is an absolute no on natural stone. And whichever cleaner you have used before it, never let vinegar follow bleach, or bleach follow vinegar. Rinse, wait, and use one thing at a time.
How often should grout be deep cleaned and resealed?
For a family shower in daily use, a paste clean every two to three months and an oxygen bleach deep clean once or twice a year is a realistic rhythm, with sealer re-done about yearly. Kitchens floors need the deep clean less often, once a year usually, because their dirt is grit rather than soap film and mould. Adjust by eye: when the lines start looking tired while the tiles are still clean, the grout is asking.
My grout is crumbling. Will cleaning or a grout pen fix it?
No, and I wish I could say otherwise. Crumbling, sandy or cracking grout is failing grout, and cleaning just washes more of it away while a pen coat bridges over a surface that is still falling apart underneath. The real fix is raking out the loose lines and re-grouting them, which is a bigger job but a weekend-sized one for a single wall or a small floor. Everything in this post assumes the grout underneath is sound.
So: gentle first, dwell time always, stronger stuff only where the paste honestly fails, and a squeegee within arm's reach of the shower from now on. Some of your lines will come back white. Some will come back nearly white. Both are a win worth an hour. Tell me in the comments which room is your worst offender, and I will tell you which of these I would start with in there.
Lisa Ben
Lisa paints, builds, thrifts and rearranges her way through one very patient house, then writes down everything she learns here on Wazala. She owns more old toothbrushes saved for grout than most people own actual toothbrushes. New projects land every Tuesday, Thursday and Saturday, and the Sunday Letter rounds them up once a week.
You might also like
How To Clean A Stainless Steel Sink Until It Shines
Water spots, the dull film and the grubby rim around the taps, sorted with a paste you already own.
Read more →
The Weekly Cleaning Schedule That Keeps A House Caught Up
The small weekly routine that stops the big horrible cleans from ever being needed.
Read more →
How To Organize A Small Pantry When The Shelves Are Too Deep
Deep shelves swallow tins whole. Bins, risers and a strict front-row rule bring them back.
Read more →